
How to conduct an OSINT investigation (in 8 steps)

headshot of Nico Dekens – aka “Dutch OSINT Guy”Nico Dekens – aka “Dutch OSINT Guy”
14 Oct 2026
Investigator working through the eight steps of an OSINT investigation on a link analysis graph
Key Takeaway

This is how to conduct an OSINT investigation in eight steps: frame the question, lock down OpSec, pivot from the seed identifiers, collect and preserve the evidence, verify and disambiguate the subject, analyze the links, monitor for change and write the report. This guide walks one corporate threat case through every step so you can see what each one produces and where it breaks.

An OSINT investigation is not decided by how much the investigator collects. It is decided by whether the investigator can show which candidate was dropped, why the surviving one was kept and how each claim in the report traces back to a timestamped capture. Organizations spent USD 12.7 billion on OSINT in 2025, according to Global Market Insights (December 2025). Most of that money bought collection speed rather than that record. This guide shows the record on a worked case.

The case: a corporate security team receives a threatening direct message aimed at its chief financial officer. The investigator starts with one social handle, one email address and one screenshot. Every step below shows what the investigator does with those three items, what the output looks like (the intake brief, the candidate table, the evidence log, the hypothesis matrix, the report) and where the step usually breaks. By the end you will have seen one namesake dropped, one four-account cluster promoted to the subject and two hypotheses scored against the evidence.

The case is fictional. The method is the one ShadowDragon® investigators use inside the Horizon® platform for open source intelligence (OSINT) work.

Every technique here works on publicly available data without bypassing a login or violating a platform’s terms of service.
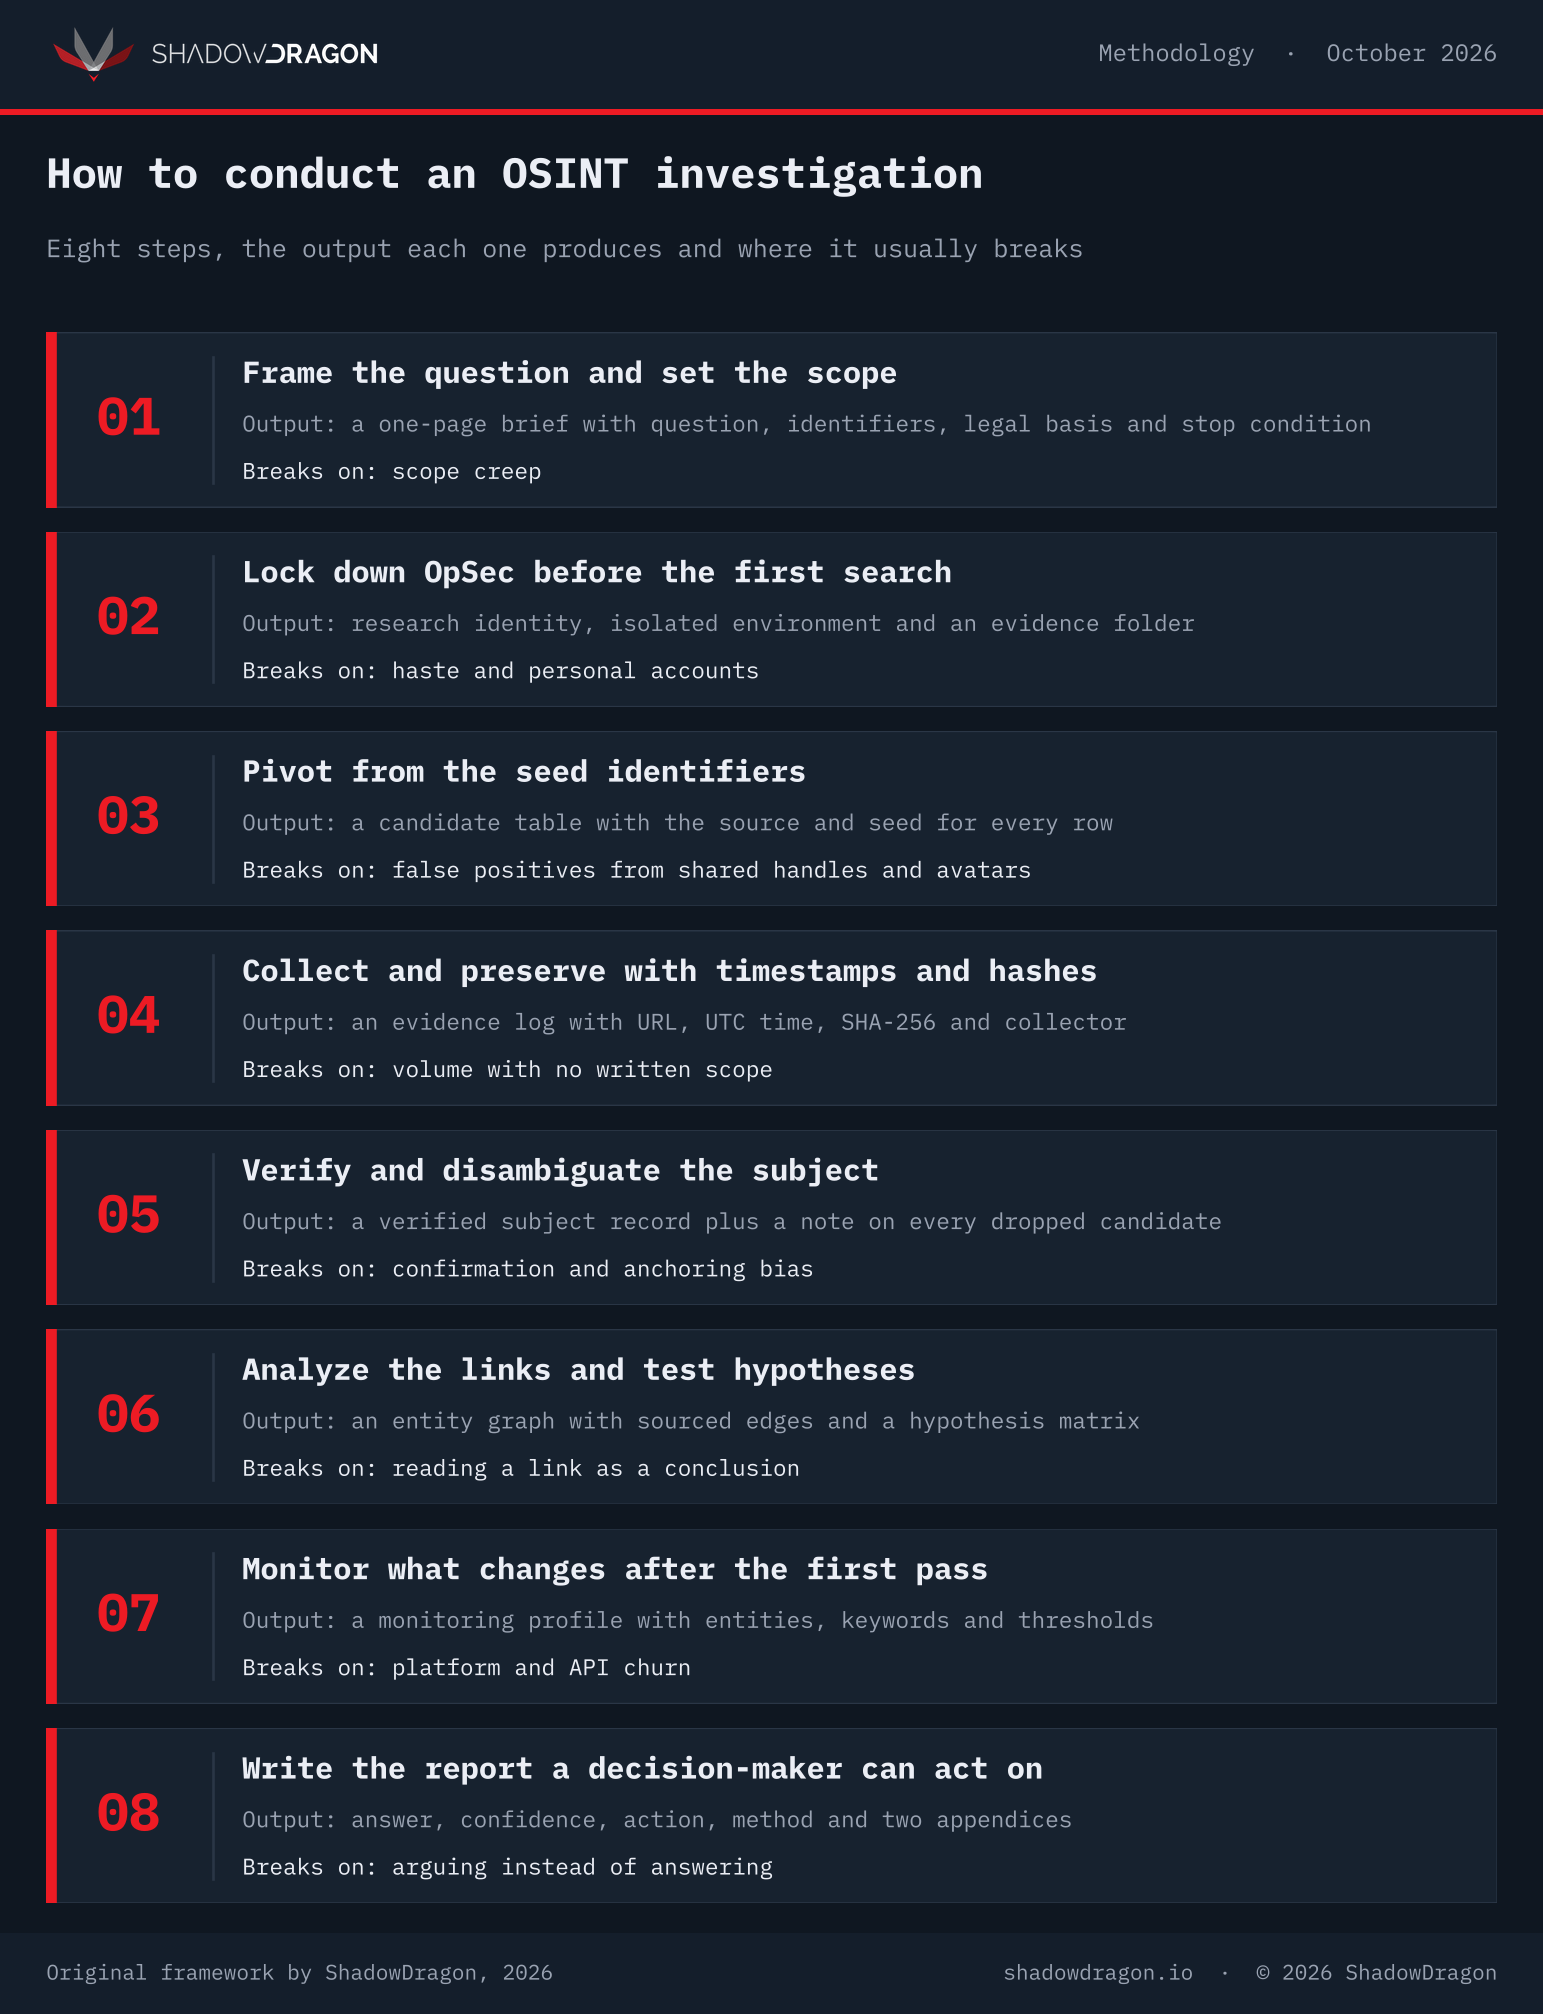
The eight steps of an OSINT investigation with the output and failure point of each stepThe eight-step OSINT investigation framework. Original framework by ShadowDragon, 2026.
Step 1: Frame the question and set the scope

To scope an OSINT investigation, write the question down before you open a search box. Define it narrowly enough that every piece of evidence either serves it or gets discarded.

The question for this case has two clauses:

  1. Who controls the account that sent the message
  2. Whether the sender has the means or intent to act on it

The intake brief then records the identifiers in hand (handle, email, screenshot with its timestamp), the legal basis and jurisdictions involved, because GDPR and state privacy law decide what you may retain. It closes with the stop condition, meaning the finding that would end the inquiry or escalate it to law enforcement.

Where this step fails: “scope creep.” Investigators who skip the brief drift from “who sent this” into a full life history of a stranger, which wastes hours and creates retention liability.

A structured and systematic approach to OSINT investigations keeps the question in front of you.

Output of step 1: a one-page brief with the question, identifiers, legal basis, retention rule and stop condition. Nothing else happens until that page exists.

Step 2: Lock down OpSec before the first search

Every OSINT investigation exposes the investigator as much as the subject. Opening a profile from a personal account, visiting a forum from the office IP range or liking a post by accident can tip the subject that someone is looking. In a threat case that is the moment the account goes private and the evidence disappears.

The investigator sets up a research environment before touching the handle. Good OpSec means staying invisible:

  • Personal devices and accounts are never used for investigative operations.
  • Research identities are believable, have history and stay separate from real-world identifiers.
  • Devices and browser profiles are compartmentalized per case.
  • Connections go through a VPN or a managed egress point, never the corporate network.
  • Fingerprinting countermeasures (browser isolation, script blocking) are on by default.

Where this step fails: platforms watch behavior as well as IP addresses. The OSINT browser extensions that help here (archivers, user-agent switchers, script blockers) belong in the research profile, never in the personal one.

The mindset behind the whole setup is covered in Thinking in OSINT: a field guide. Scrolling too fast, clicking too predictably or opening fifty profiles in a minute triggers automated defenses and burns the research identity. Assume every click, login and query is logged, because it probably is.

Output of step 2: a documented research environment, a named research identity and an evidence folder with a naming convention. Running pivots through a platform instead of a hand-driven browser keeps the investigator’s own fingerprint off the subject’s profile, which is what Horizon® Identity is built for.

Step 3: Pivot from the seed identifiers to candidate identities

Pivoting is the technique that turns one identifier into many. The investigator takes the handle, the email and the screenshot and asks each one a different question.

  • The handle: where else does this exact string or a near variant appear, which is what OSINT username lookup tools answer.
  • The email: which accounts were registered with it and what the domain tells you, starting with the email permutator to enumerate the variants worth checking.
  • The screenshot: what the profile picture, the display name and the post timing reveal.
  • The image forensics tool shows whether the avatar has been edited.

In our example case, the handle resolves to accounts on three other platforms with the same avatar. The email address returns a registration on a gaming forum and a public breach notice that confirms the address is real and active. Reverse image search on the avatar finds the same picture on a dating profile that lists a city.

But none of this is proof yet. It is a list of candidates and a map of where to collect.

The full catalogue of OSINT investigation techniques for this stage includes username enumeration, email permutation, reverse image search and metadata extraction. Cross-platform profile discovery is covered step by step in the OSINT social media search guide.

Where this step fails: false positives. Common handles collide, avatars get reused and a breach record can belong to a namesake. The investigator records every candidate with the evidence that links it to the seed. Nothing is promoted to “the subject” until Step 5.

The OSINT Framework organizes the free OSINT tools for each identifier type. Horizon Identity runs the same pivots against 550+ sources in a single query. The right platform and tools for this stage are compared in the OSINT tools guide.

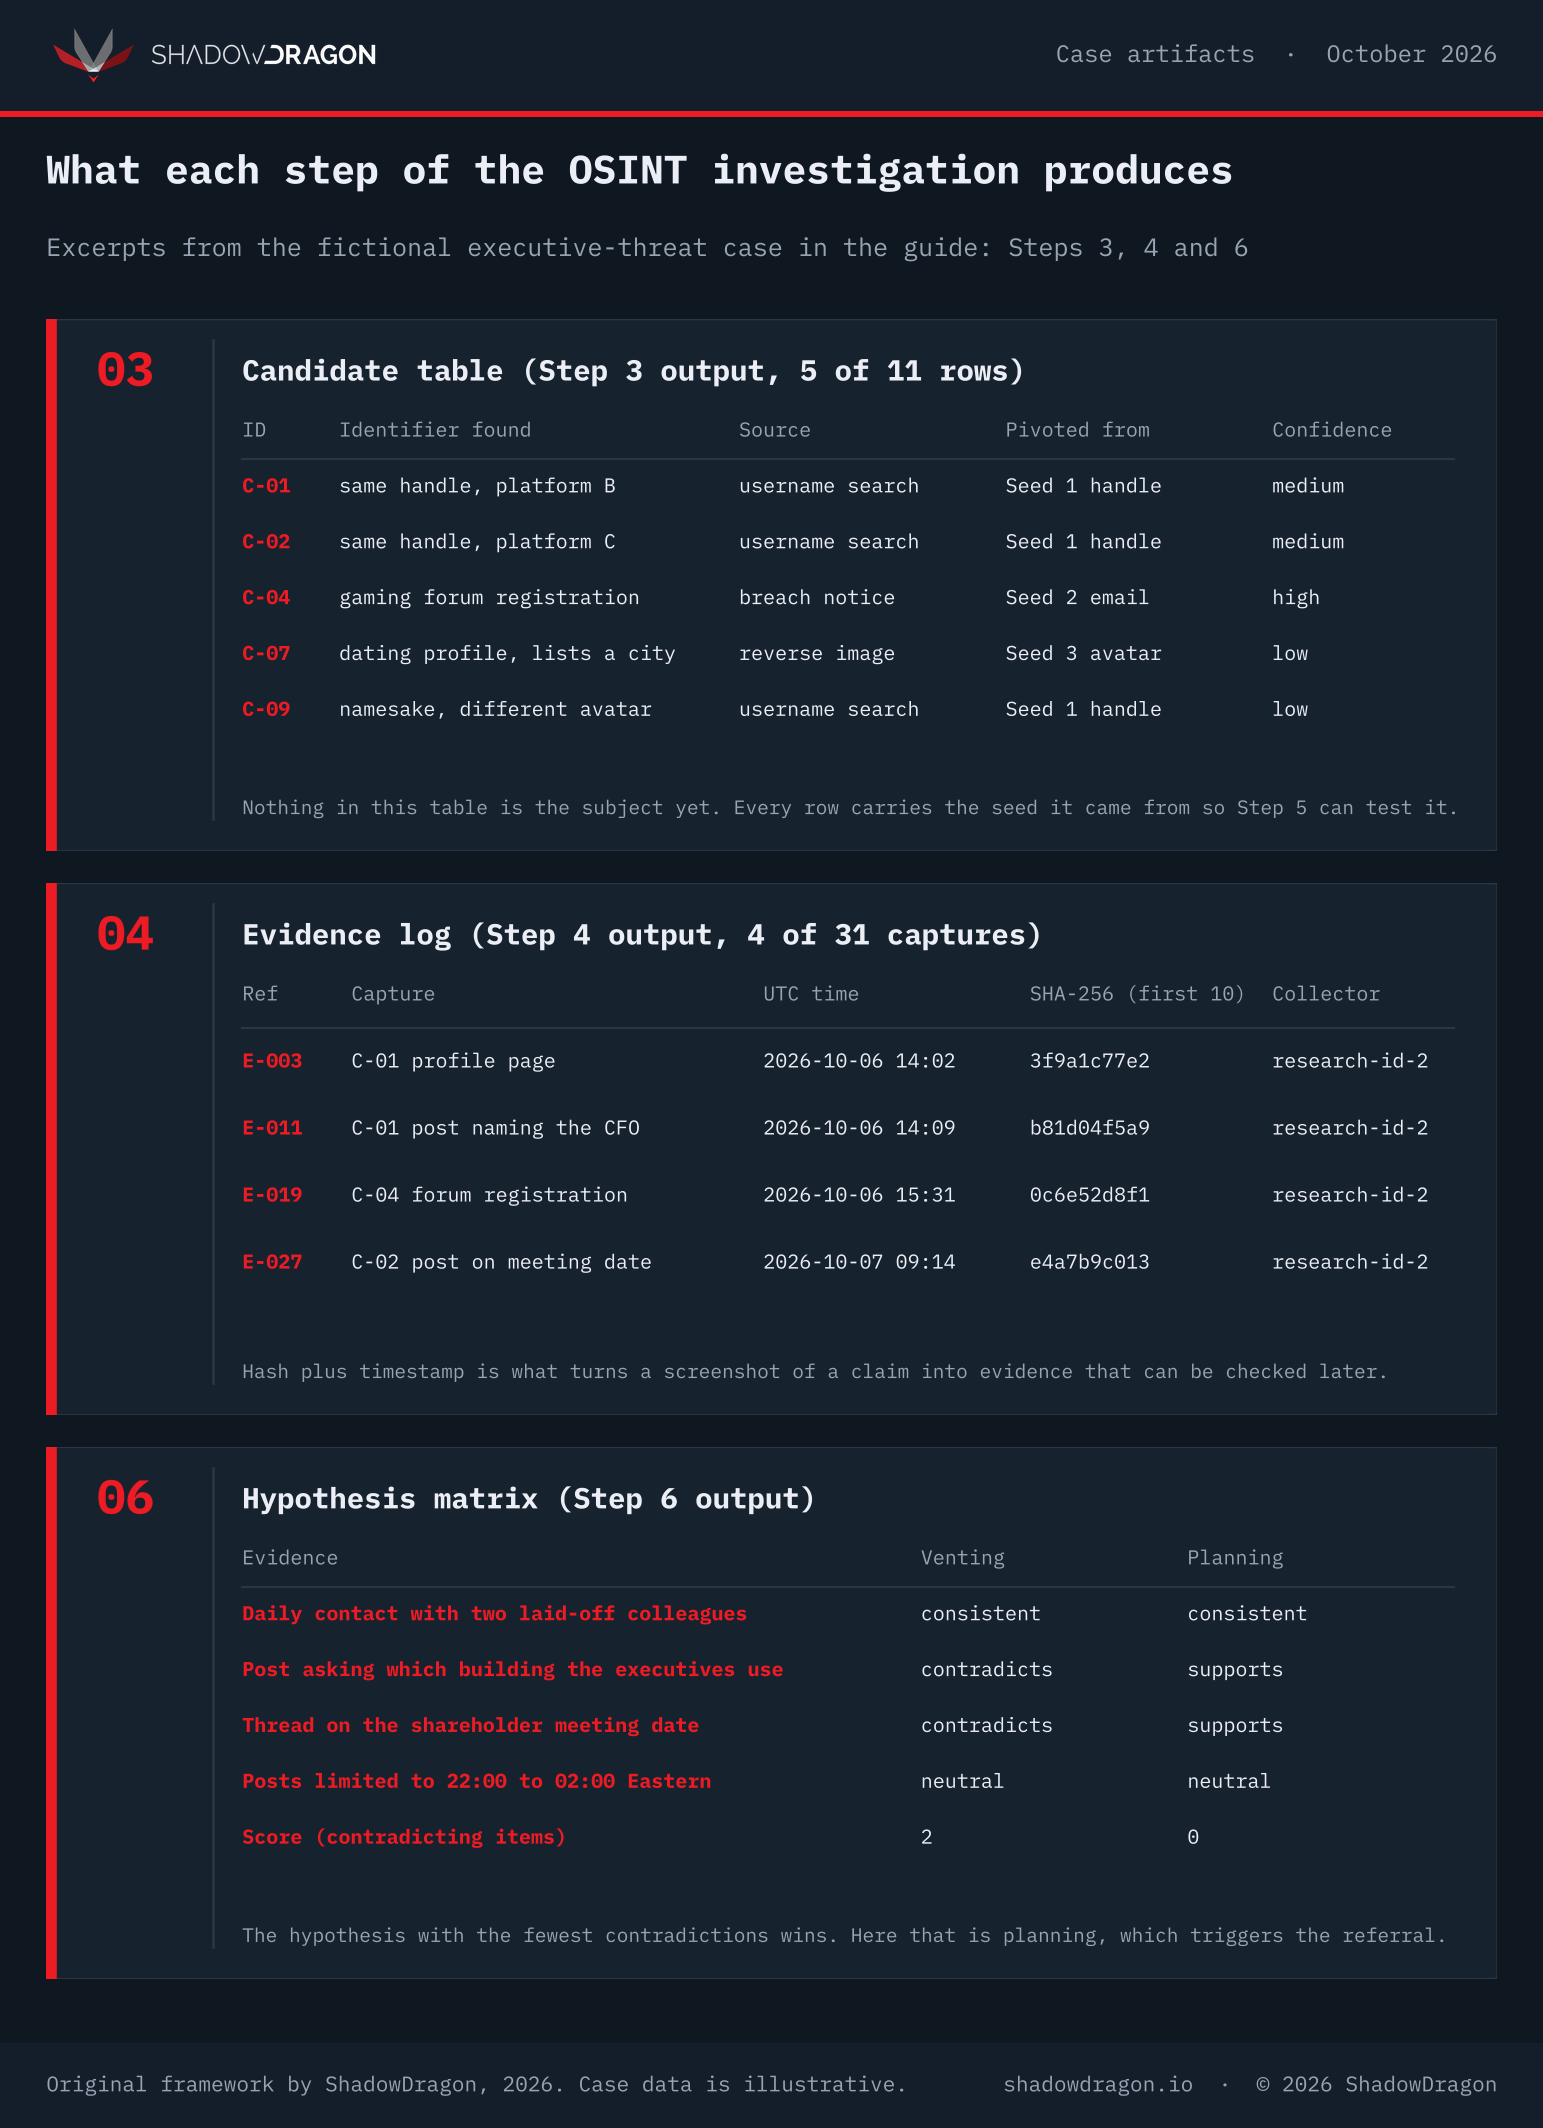
Output of step 3: a candidate table. Each row is an identifier, the source that returned it, the seed it pivoted from and a confidence note. For this case the table has eleven rows after the first pass.

Step 4: Collect and preserve, with timestamps and hashes

Collection in an OSINT investigation means capturing the evidence in a form that will still exist and still be trusted in six months. Posts get deleted, stories expire and accounts go private.

If the investigator cannot show when a capture was made and that it has not been altered since, the capture is a screenshot of a claim, not evidence.

For each of the eleven candidates the investigator captures the profile page, the posts that reference the executive or the company and the account metadata (creation date, follower count, linked accounts). Every capture gets a UTC timestamp and a SHA-256 hash, logged in the evidence folder from Step 2.

Search operators narrow the public web fast; the Google dorks list and the dork assistant build the queries. Public sources beyond social platforms matter too: corporate registries, court records, news archives and open data feeds such as the Maritime Automatic Identification System (AIS) all count as collection targets when the question calls for them.

Our handy list of the top OSINT websites and resources is the index of where to look.

Where this step fails: volume. There are more than 200 social platforms and the volume of publicly available information grows daily, so investigators without a scope drown in it. The brief from Step 1 decides what is collected. Collection from dark web forums or encrypted channels requires its own tooling and a legal review before it starts.

Output of step 4: an evidence log with one line per capture (source, URL, timestamp, hash, collecting identity). Horizon® Investigate and the SocialNet® API are built to collect at this scale with the source and capture time recorded on each item.

Eliot Higgins, founder of Bellingcat, described the same collection discipline to Thought Economics, saying:

“our process is about rigorous triangulation, often involving a multitude of diverse sources”
– Eliot Higgins, Founder, Bellingcat. Thought Economics interview, July 2023

Triangulation only works when each source was captured in a form that can be checked later, which is what the timestamp and hash provide.

Sample candidate table, evidence log and hypothesis matrix from an OSINT investigationWhat Steps 3, 4 and 6 produce in the walkthrough case. Original framework by ShadowDragon, 2026; case data is illustrative.

Step 5: Verify and disambiguate the subject from lookalikes

To verify OSINT findings and avoid misidentification, cross-reference every candidate against at least two independent sources, test the candidates against each other and try to disprove the strongest match before accepting it. The investigator takes the candidate table from Step 3 and checks whether the accounts that share an avatar post at the same hours, whether the city on one profile matches the time zone implied by another and whether the registration dates fall in a plausible order.

A match that survives those tests is corroborated. A match that fails any of them is a lookalike and is dropped with a note.

In the sample case, two candidates survive. One is a namesake with a different avatar history, dropped. One is a cluster of four accounts that share an avatar, a posting window of 22:00 to 02:00 Eastern and a recurring reference to a layoff at the company nine months earlier. That cluster becomes the working subject. The layoff reference is the first indicator of motive.

Where this step fails: cognitive bias. Confirmation bias pulls the investigator toward the candidate that matched first. The OSINT analysis techniques guide covers the structured methods that counter it.

Identity intelligence explains what a resolved identity record should contain. Anchoring locks attention on the earliest clue. The availability heuristic overweights the sources that were easiest to reach.

The counter is procedural: peer review of the candidate table, Analysis of Competing Hypotheses on the two survivors and a deliberate attempt to disprove the working subject before promoting it.

Output of step 5: a verified subject record with the corroborating evidence for each link, plus a written note on every candidate that was dropped and why. The drops matter as much as the match if the case reaches a lawyer.

Nico Dekens summarized the verification mindset on Maltego’s Pivot podcast:

“Critical thinking, doubting everything, assuming nothing, and checking everything.”
– Nico Dekens, Senior SANS Instructor and ShadowDragon contributor. Maltego, The Pivot podcast, May 2023

That standard is why Step 5 tests the strongest candidate hardest instead of accepting it first.

Step 6: Analyze the links and test the competing hypotheses

Link analysis turns the verified record into a picture of the subject’s network. The investigator loads the subject cluster, the people who interact with it, the locations and the dates into a graph.

Nodes are entities. Edges are the evidence that connects them, each one pointing back to a line in the evidence log. The graph answers the second clause of the question: means and intent.

In the case example, the graph shows the subject interacting daily with two former colleagues who were laid off in the same round, a public post three weeks earlier asking which building the executive team works from and a comment thread discussing the company’s shareholder meeting date. Individually each item is explainable. Together they move the assessment from “angry former employee” to “possible planning.”

Where this step fails: the graph gets treated as proof. A link is a relationship, not a conclusion.

The investigator writes two competing hypotheses, venting versus planning, lists the evidence that supports and contradicts each and scores them. The hypothesis with the least contradicting evidence wins, not the one with the most supporting evidence.

Output of step 6: an entity graph with sourced edges and a hypothesis matrix. Horizon Investigate is the link analysis module built for this step, so the graph is drawn from the same collection the evidence log records.

Nico Dekens put the same rule to CloverDX’s Behind the Data podcast, telling investigators to challenge every outcome against the data collected and to

“be your own devil’s advocate”
– Nico Dekens, Senior SANS Instructor and ShadowDragon contributor. CloverDX, Behind the Data podcast, episode 17

The hypothesis matrix in Step 6 is that rule written down.

Step 7: Monitor what changes after the first pass

An OSINT investigation is a snapshot. The subject keeps posting after the report is written.

In a threat case, the posts after the first pass matter more than the ones before it. The investigator sets up monitoring on the verified subject cluster, the two associated accounts and the keywords from the hypothesis matrix (the building, the meeting date, the executive’s name).

Monitoring has to be scoped like collection. Alerts on every post from four accounts are manageable. Alerts on every mention of the company are not. The investigator tunes the alert set to the indicators that would change the hypothesis score.

Where this step fails: the digital terrain moves. Platforms change APIs, accounts migrate and content expires. Monitoring that depends on one platform’s public endpoint breaks when that endpoint does.

Horizon Monitor and the strategies in social media threat monitoring are built for that churn. For agencies, the social media monitoring tools for law enforcement comparison covers the alternatives. Automating OSINT shows how to turn a one-off monitoring profile into a repeatable workflow.

Output of step 7: a monitoring profile with the watched entities, the keyword set, the alert thresholds and a review cadence. In the example case, the profile runs through the shareholder meeting date plus thirty days.

Step 8: Write the report an attorney or a chief can act on

To write an OSINT investigation report, answer the question from Step 1 in the first paragraph, state the confidence level and say what action the evidence supports. The report is the only part of the OSINT investigation most decision-makers will read.

The method section explains how the subject was verified. The evidence appendix lists every capture with its timestamp and hash. The dropped candidates get their own appendix, because the matches you rejected are as much a part of the finding as the one you kept.

In the example case, the report concludes with moderate confidence that the account is controlled by a former employee, that the subject has discussed the executive team’s location and schedule and that the pattern meets the company’s threshold for a referral to law enforcement.

It recommends the referral, the monitoring profile from Step 7 and a review of physical security for the meeting date. It does not speculate about what the subject will do.

Where this step fails: the report tells the story the investigator wants to tell. The audience changes the format too: a corporate security team wants a referral decision, a law enforcement partner wants an evidence package and a fraud and risk team wants the identity record.

The fix is to write the contradicting evidence into the body rather than the footnotes. Then have a second analyst read the report against the evidence log before it goes out.

Output of step 8: a report with a one-paragraph answer, a confidence statement, a recommended action, a method section and two appendices. Every claim in it points to a line in the evidence log.

Where OSINT investigations usually breaks

OSINT investigations fail in predictable places.

  • Steps 1 and 4 fail on volume when there is no written scope.
  • Step 2 fails when the investigator is in a hurry.
  • Steps 3 and 5 fail on false positives and bias.
  • Step 6 fails when a link is read as a conclusion.
  • Step 7 fails when a platform changes.
  • Step 8 fails when the report argues instead of answers.

Legal and ethical limits run through every step. Creating fake accounts to access restricted content, scraping through unauthorized APIs and automating interactions with a subject’s account violate platform terms of service and can expose the organization to legal action.

The techniques in this guide work on publicly available data and keep the investigator inside those limits.

Two things improve every step:

  1. Skill development, which is why ShadowDragon publishes OSINT exercises and maintains a list of OSINT training courses alongside its own Horizon training.
  2. A second set of eyes, because peer review catches the bias the investigator cannot see.

If you want to run this walkthrough on a live case, ShadowDragon® builds Horizon® for investigators who need the eight steps in one workspace. Horizon® Identity handles Steps 3 and 4 from a phone number, email or username against 550+ publicly available sources.

Contact us today to see it on your own case type.

Frequently asked questions

How long does an OSINT investigation take?

An OSINT investigation takes one to three analyst days for a scoped identity case like the one in this guide when collection is automated. The same OSINT investigation takes one to two weeks when every pivot is run by hand.

The scope set in Step 1 is the biggest driver of how long it takes. An unscoped inquiry has no natural end.

What are the limitations of OSINT?

The limitations of OSINT are that the data may be unavailable, unreliable or restricted. Privacy law and platform terms of service add a fourth limit on what you may collect and keep.

Is OSINT accurate?

OSINT is accurate when it is cross-validated and inaccurate when it is not. Step 5 of this guide is that cross-validation.

What are the biggest risks in OSINT investigations?

The biggest risks in an OSINT investigation are:

  1. Exposure of investigative intent
  2. Legal violations
  3. Misidentification
  4. Acting on bad intelligence

Poor operational security (Step 2) can compromise the investigator’s identity. Skipping verification (Step 5) is how the wrong person ends up in a report.

What tools do you need for an OSINT investigation?

The tools you need for an OSINT investigation are:

  1. A research browser profile
  2. A VPN or managed egress point
  3. An evidence log with hashing
  4. A reverse image search
  5. A username and email pivoting tool
  6. A link analysis graph

Free OSINT tools cover each category for small cases.

Horizon® combines pivoting, collection, link analysis and monitoring in one platform for teams that run OSINT investigations every week.